Closing a Shopify store isn’t a decision to be made lightly. Whether you’ve completed your eCommerce journey or are preparing to switch to a new platform, it’s vital to properly cancel your subscription and deactivate your store to avoid any unexpected charges or data loss.
Shopify, a leading eCommerce platform trusted by over 2 million businesses, gives you full control over managing your store, including the option to pause or permanently close it. However, if you don’t follow the right steps, you might encounter unnecessary complications.
In this article, I’ll take you through the exact steps I followed to successfully cancel my Shopify subscription and close my store. Be sure to follow along carefully to ensure everything is done smoothly and securely, especially if you’re planning to step away from the platform for good.
Also read: How I Cancelled My Disney Plus Subscription
- Step 1: Log Into My Shopify Account
- Step 2: Secure the Account
- Step 3: Navigate to Store Settings
- Step 4: Uninstall Paid Apps
- Step 5: Deactivate the Store
- What Happened After Deactivation?
- Facts & Figures: Canceling a Shopify Store
- Frequently Asked Questions (FAQs)
- 1. Why Would Someone Want to Cancel Their Shopify Store?
- 2. What Should I Consider Before Cancelling My Shopify Subscription?
- 3. How Can I Back Up My Shopify Store Data?
- 4. What Happens to My Shopify Domain After Cancellation?
- 5. What Happens to My Store After I Cancel It?
- 6. Can I Pause My Store Instead of Closing It?
- 7. What Mistakes Should I Avoid When Cancelling a Store?
- 8. Should I Contact Shopify Support Before Cancelling?
- 9. Can I Reactivate My Store Later?
- 10. What Are the Alternatives to Shopify?
- Final Thoughts
Step 1: Log Into My Shopify Account
To begin, I logged into my Shopify account. Since I only had one store, I selected it for deactivation. If you have more than one, make sure to choose the correct store before continuing.
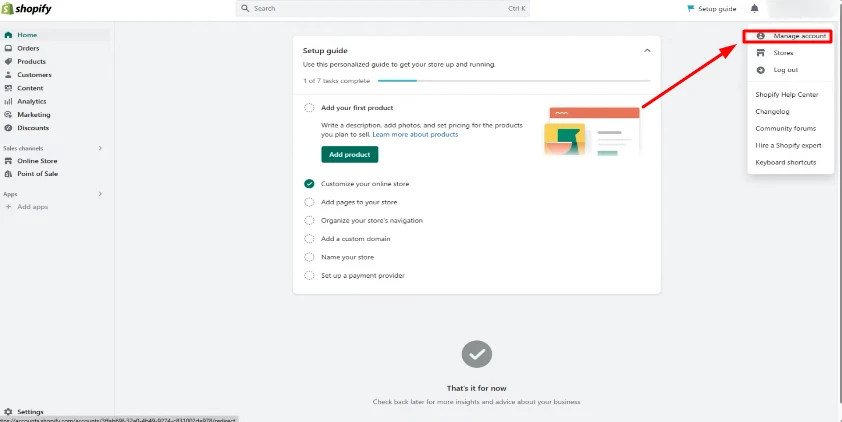
Once inside the dashboard, I clicked on my name at the top-right corner and selected the “Manage account” option.
Step 2: Secure the Account
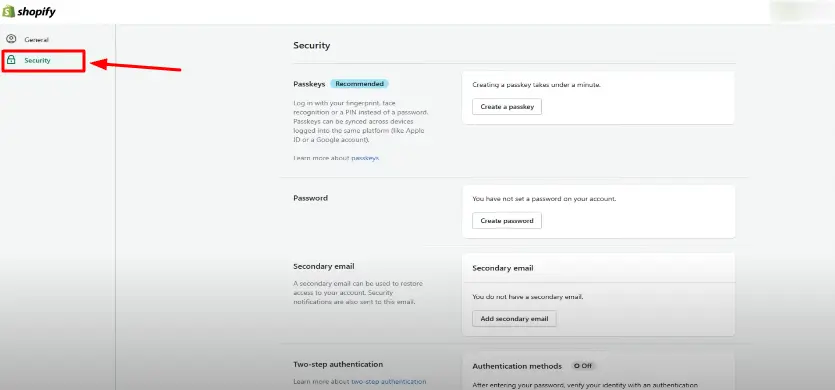
From there, I was taken to a page with multiple settings. On the left-hand side, I located the Security Settings. I scrolled down to the Devices section and made sure I was logged out of every device.
What I did in this step:
- Logged out from all active devices
- Turned off all authentication methods if they were enabled
- Deleted any old login services for extra security
Once I verified that everything was secure, I returned to the main dashboard.
Step 3: Navigate to Store Settings
Back on the dashboard, I clicked on Settings located in the bottom-left corner of the screen. This opened up all the configuration options related to my Shopify account.
I then selected the Plan section, which is where all the store management features are located.
Step 4: Uninstall Paid Apps
Before moving forward, I needed to make sure that I wouldn’t get charged for any third-party services after closing the store. So I uninstalled all apps that were connected to my Shopify store and involved any billing.
Checklist I followed:
- Went to the Apps section
- Identified all paid apps
- Uninstalled each one to prevent any future charges
Only after I confirmed that no apps were left did I move on.
Step 5: Deactivate the Store
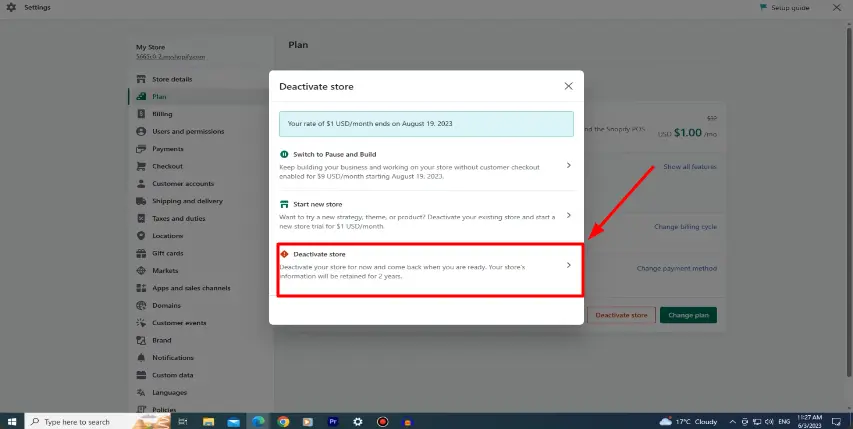
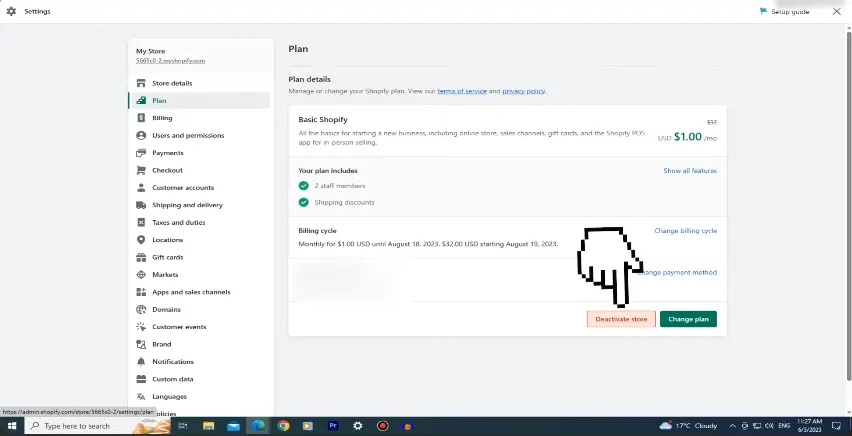
After cleaning up the apps, I returned to the Plan section and clicked the “Deactivate Store” button.
A pop-up menu appeared with a few different options. I chose the third one, which also said “Deactivate Store.”
At this point, Shopify asked me for a reason behind the deactivation. I selected “Other Reason” from the list and proceeded.
I was then shown a warning that deactivating the store would result in the loss of access to:
- Sales data
- Reports
- Product and customer information
I confirmed that I understood the terms and clicked the “Deactivate” button to complete the process.
What Happened After Deactivation?
Once I completed the deactivation, I received a confirmation message. Here’s a summary of what Shopify informed me:
| Item | Status |
|---|---|
| Store Status | Deactivated |
| Data Retention | Stored for 2 years |
| Reactivation Option | Available anytime by resubscribing |
Even though my store was closed, I found it reassuring that my data would be kept safe for two years and I could reactivate everything if I changed my mind.
Facts & Figures: Canceling a Shopify Store
| Topic | Fact / Figure | Why It Matters |
|---|---|---|
| Store Data Retention | 2 years | Shopify keeps your store’s data for up to 24 months after deactivation |
| Pause and Build Plan | $9/month | Keeps store backend active while hiding checkout |
| App Billing After Closure | May continue | Some apps may keep billing unless manually removed |
| Domain Transfer Time | 5–7 days | Transferring to another registrar takes up to a week |
| Customer Support Availability | 24/7 | Shopify offers constant help through chat or email |
| Free Trial Limitations | 3 days to 3 months | Billing begins after trial ends if not canceled |
| Store Reactivation Time | Instant | Your store reactivates immediately upon subscribing again |
| Common Mistakes | 5+ critical risks | Uninstall apps, back up data, review domain settings |
| SEO Impact | High | Closing without redirects can cause ranking loss |
| Platform Alternatives | WooCommerce, Wix, Squarespace | Top choices if migrating from Shopify |
Frequently Asked Questions (FAQs)
1. Why Would Someone Want to Cancel Their Shopify Store?
There are many reasons: switching platforms, ending your business, reducing costs, or changing models. Whatever your reason, closing your store properly prevents issues down the line.
2. What Should I Consider Before Cancelling My Shopify Subscription?
Consider whether you’ve backed up your data, removed all paid apps, handled domain transfer, and closed all device sessions. These steps help you leave on clean terms.
3. How Can I Back Up My Shopify Store Data?
Export everything: products, orders, customer lists, and even theme files. This ensures you have all your info saved if you return later.
4. What Happens to My Shopify Domain After Cancellation?
If you purchased a domain through Shopify, you’ll still own it. You can transfer it to another registrar or keep managing it via Shopify. If it’s from elsewhere, it remains under your control.
5. What Happens to My Store After I Cancel It?
Your store is deactivated. Data is saved for two years and you can reactivate any time by picking a plan. Until then, you won’t have access to the dashboard or reports.
6. Can I Pause My Store Instead of Closing It?
Yes, Shopify’s Pause and Build plan lets you keep your store running behind the scenes for $9/month while disabling the checkout.
7. What Mistakes Should I Avoid When Cancelling a Store?
Don’t forget to uninstall third-party apps, turn off security methods, back up your data, and verify domain ownership. These mistakes can lead to unnecessary charges or lost assets.
8. Should I Contact Shopify Support Before Cancelling?
Absolutely. If you’re unsure about anything — billing dates, custom domain issues, or what plan fits best — Shopify’s 24/7 support is there to help.
9. Can I Reactivate My Store Later?
Yes, your store remains saved for two years. Just log in, pick a plan, and everything comes back just as you left it.
10. What Are the Alternatives to Shopify?
Some common platforms include:
| Platform | Best For |
|---|---|
| WooCommerce | WordPress users needing full control |
| Wix | Simpler drag-and-drop stores |
| Squarespace | Brands with visual-heavy content |
| BigCommerce | Growing product-based businesses |
| Ecwid | Adding a store to any existing site |
Final Thoughts
That’s exactly how I went about canceling my Shopify subscription and wrapping up my store. I took my time with each step, ensuring I didn’t leave anything behind and steering clear of any extra charges.